
| Reys Staff |
 Star Wars The Force Awakens has been quite a phenomenon in terms of box office and proof that a great story can be continued if the right people are involved. Star Wars The Force Awakens has been quite a phenomenon in terms of box office and proof that a great story can be continued if the right people are involved.One of the most fascinating characters in the film for me, apart from BB8 of course, is Rey. Her unknown history which I'm sure we will find more about in the next two films, and the ability to harness the force seemingly without any training is quite an enigma and one I will definitely enjoy seeing unfold. Her survival skills and time on Jakku have produced many things, but one thing really caught my attention, her staff, made out of scrap. Initially I wanted to create a t-shirt design to go along with my Pinky and the Brain / BB8 design, but something else clicked in my head and out came the notion to create my own staff made out of scrap. Read the rest of the post Partly I think it was doing something a little more practical other than digital design and partly so I had something unusual to take with me to Star Wars Celebration Europe in July.
I first had a look around to see what was available commercially, which isn't much, there are a few fancy dress items available but those seem to mostly be moulded plastic and are quite small. I then looked to see if anyone else had made one themselves and found a few people had. 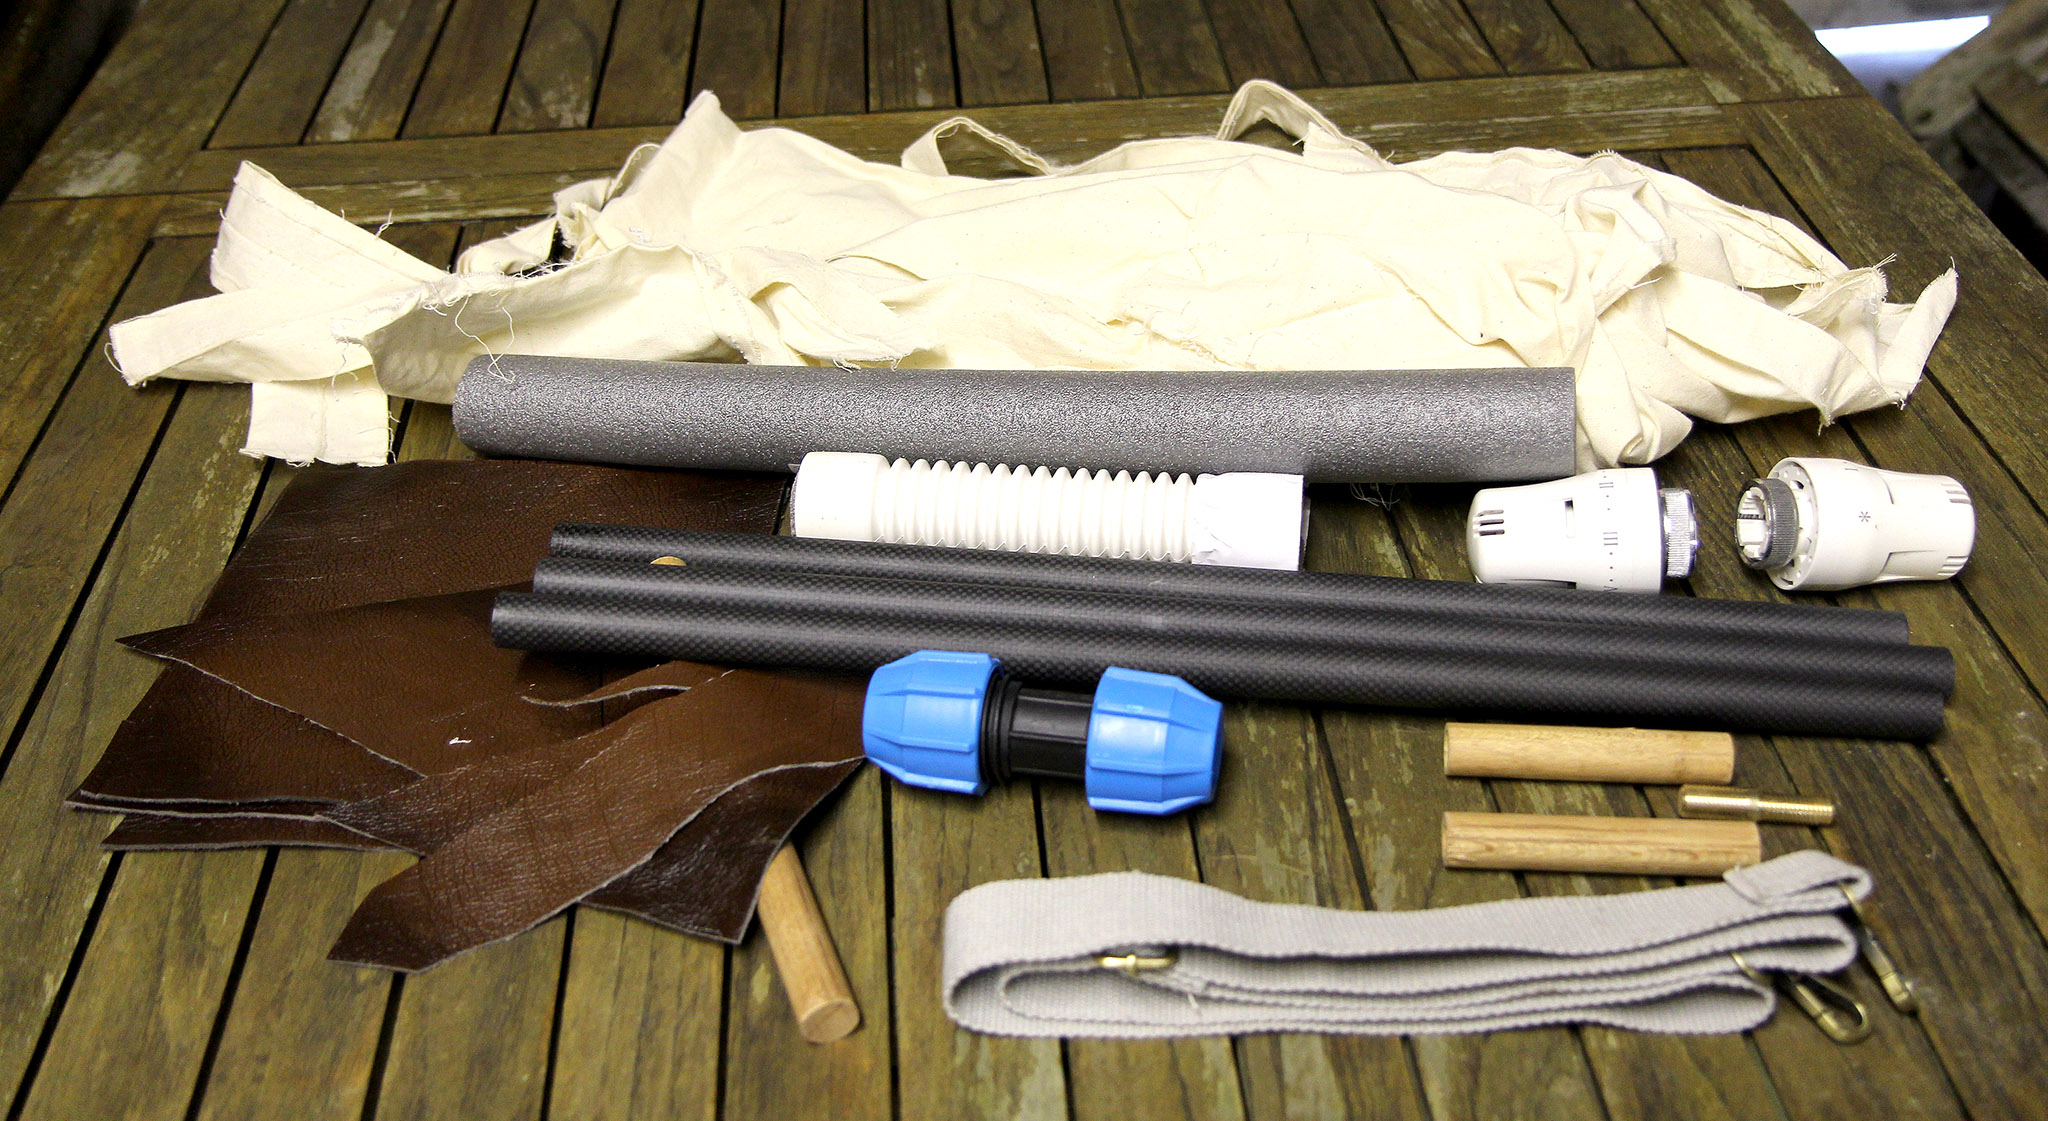 The Rey staffs I had seen were nice but in the end I felt that I didn't want to follow someone elses method and could do it in my own unique way. So the principals I set myself were to use as much stuff from around the house as possible, as I have collected a lot of useful rubbish over the years, but also make the staff portable. The Rey staffs I had seen were nice but in the end I felt that I didn't want to follow someone elses method and could do it in my own unique way. So the principals I set myself were to use as much stuff from around the house as possible, as I have collected a lot of useful rubbish over the years, but also make the staff portable.The reason for the portable requirement was that carrying a 5 to 6 foot staff made out of junk on trains or through crowded streets when travelling to a convention could be a little awkward, so the more compact I could make it the better. The picture above shows my initial haul of stuff, the only thing not recycled is the staff itself, and before you say there is no 6ft staff in the picture, I can assure you it is there. The staff is the one thing I did purchase, after some research into plastic and metal plumbing pipes, as well as wood dowels, in order to keep it light but strong I decided upon carbon fibre.  I ordered some from a company in Hong Kong via eBay at a very reasonable price and it was delivered very quickly. The next issue was joining the tubes to make one big staff that can easily be assembled and disassembled when required. I ordered some from a company in Hong Kong via eBay at a very reasonable price and it was delivered very quickly. The next issue was joining the tubes to make one big staff that can easily be assembled and disassembled when required.The solution was fairly simple, use some snooker / pool cue fittings that are used to extend the length of the cue. I also ordered some wooden dowells to fit inside the carbon tube, and my Brother in law kindly provided some much needed assistance to drill the holes in the end of the dowells.  As you can see on the right of the picture above I had a staff that is approximately 150cm tall as each carbon fibre tube was 50cm in length. I knew I was going to add something to the ends so the length would be between 150 and 200 cm. As you can see on the right of the picture above I had a staff that is approximately 150cm tall as each carbon fibre tube was 50cm in length. I knew I was going to add something to the ends so the length would be between 150 and 200 cm.Here you can see the staff with a couple of the junk items I had available just loosly fitted. I chose a diameter of 20mm for the tube as I knew I had some 22mm plumbing parts and these have an internal diameter of 20mm which fit very nicely onto the tube. 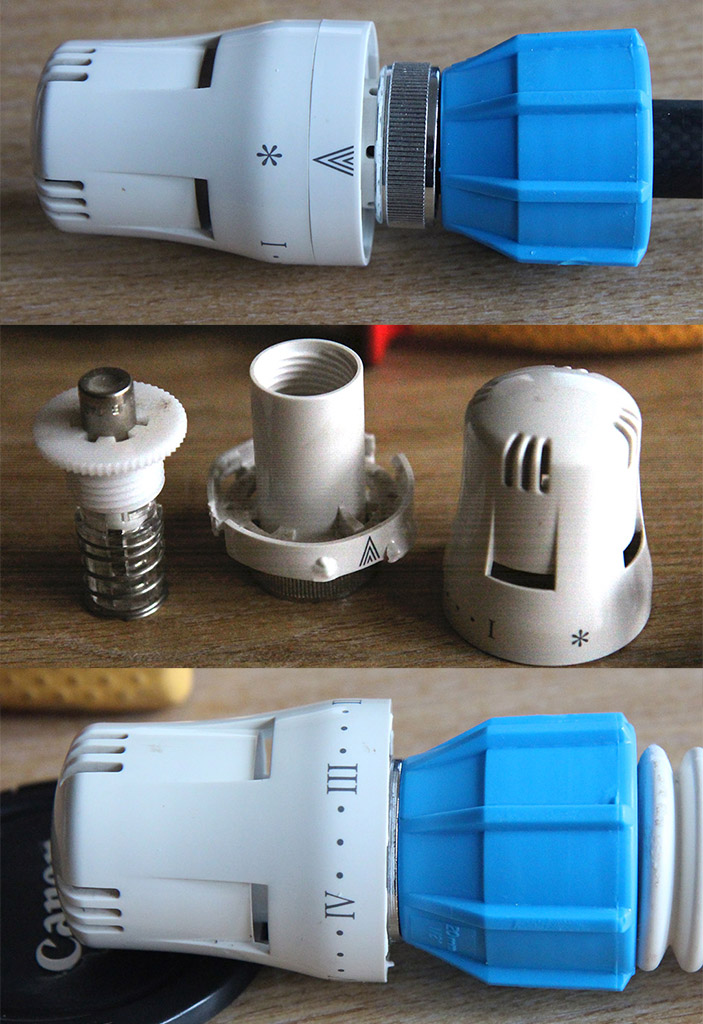 The two things you can see fitted are a radiator valve and a simple plastic plumbing pipe connector. If you look in the initial junk picture above you can see it in one piece, I just sawed the ends off and it fits like a glove because of the rubber O ring in it that keeps it in place. The two things you can see fitted are a radiator valve and a simple plastic plumbing pipe connector. If you look in the initial junk picture above you can see it in one piece, I just sawed the ends off and it fits like a glove because of the rubber O ring in it that keeps it in place.The radiator values at either end have been in the house for about 5 years when we had our heating re-plumbed. If you wander around our house you will see them on the radiators. I wanted three of these to try and match the look of the staff in the film, but more on the third later. As you can see at the top of the photograph the metal collar and plastic shaft stick out a bit when it is in its unaltered state. This didn't look right so I knew it would have to be altered. I took it apart and you can see the contents, I cut off the collar at the bottom and reglued the shaft back inside and it looked about right. I later took of the metal ring altogether as it really wasn't needed. 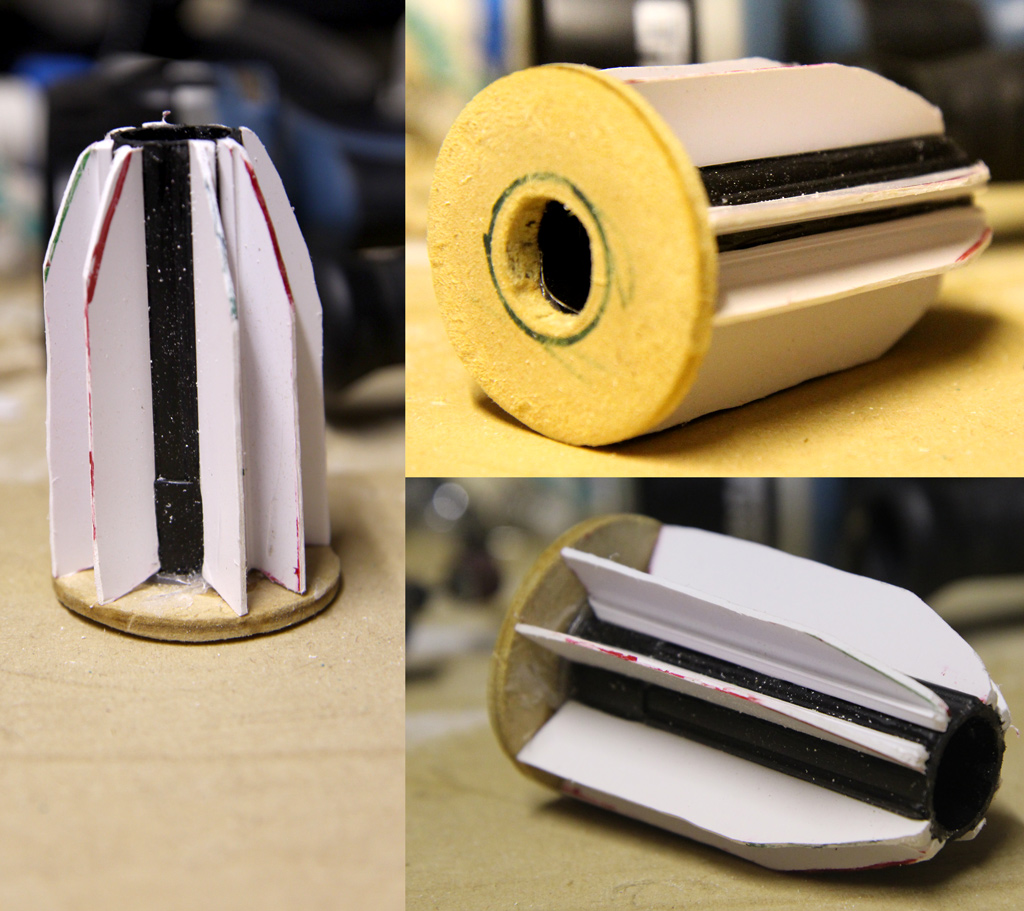 Next I needed to tackle an item I had no clue about what it was, it is possibly an impellar from some sort of Imperial / First Order pump, but in reallity I was stuck. The only option I had was to create one. I used a piece of plastic tubing from an old fish pond fountain as the core, cut a disc of scrap wood for the base and cut some blades / fins from some scrap plastic trunking, shaving down the ends to approximate the part seen on Rey's staff. Next I needed to tackle an item I had no clue about what it was, it is possibly an impellar from some sort of Imperial / First Order pump, but in reallity I was stuck. The only option I had was to create one. I used a piece of plastic tubing from an old fish pond fountain as the core, cut a disc of scrap wood for the base and cut some blades / fins from some scrap plastic trunking, shaving down the ends to approximate the part seen on Rey's staff.The end result, when painted a uniform colour, is something I am very pleased with. 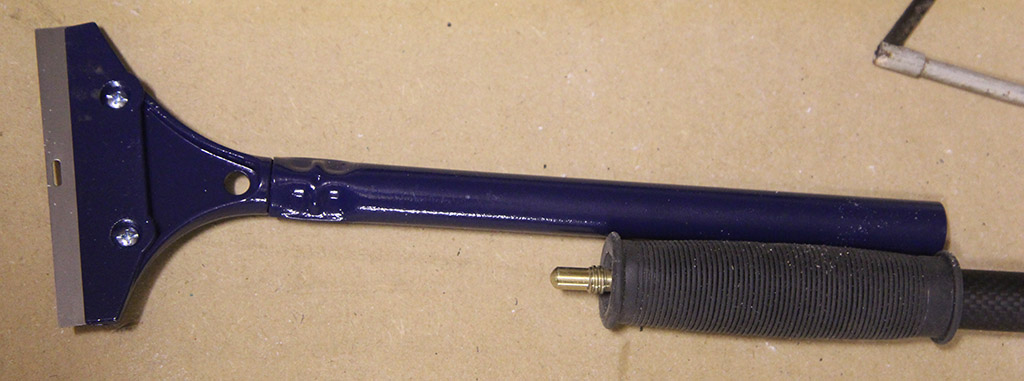 Next I wanted to look for some of what appears to be ridged grip in quite a few places along the length of the staff. Next I wanted to look for some of what appears to be ridged grip in quite a few places along the length of the staff.I knew I had some electical trunking that would do the job, but I didn't want to use that for every part so I started looking around. I found a couple of tile scrapers that were purchased many years ago and hardly used in a bathroom renovation. The handles looked about the right size and indeed they fitted almost perfectly, I say almost as they are a very tight fit, and I don't think I'll be able to get them off now they are properly in place. I moved the from where they are in the picture, which took a lot of effort, as they were better suited in another position.  I then went back to look for the electrical trunking for the rest of the grips and while I was hunting it out I serendipitously found a third spare radiator valve ! Fantastic news as it saved me having to try and find something else that fitted. I simply drilled a hole in the top and fitted a wooden disc at the base to make it a simple thing to slide onto the staff. 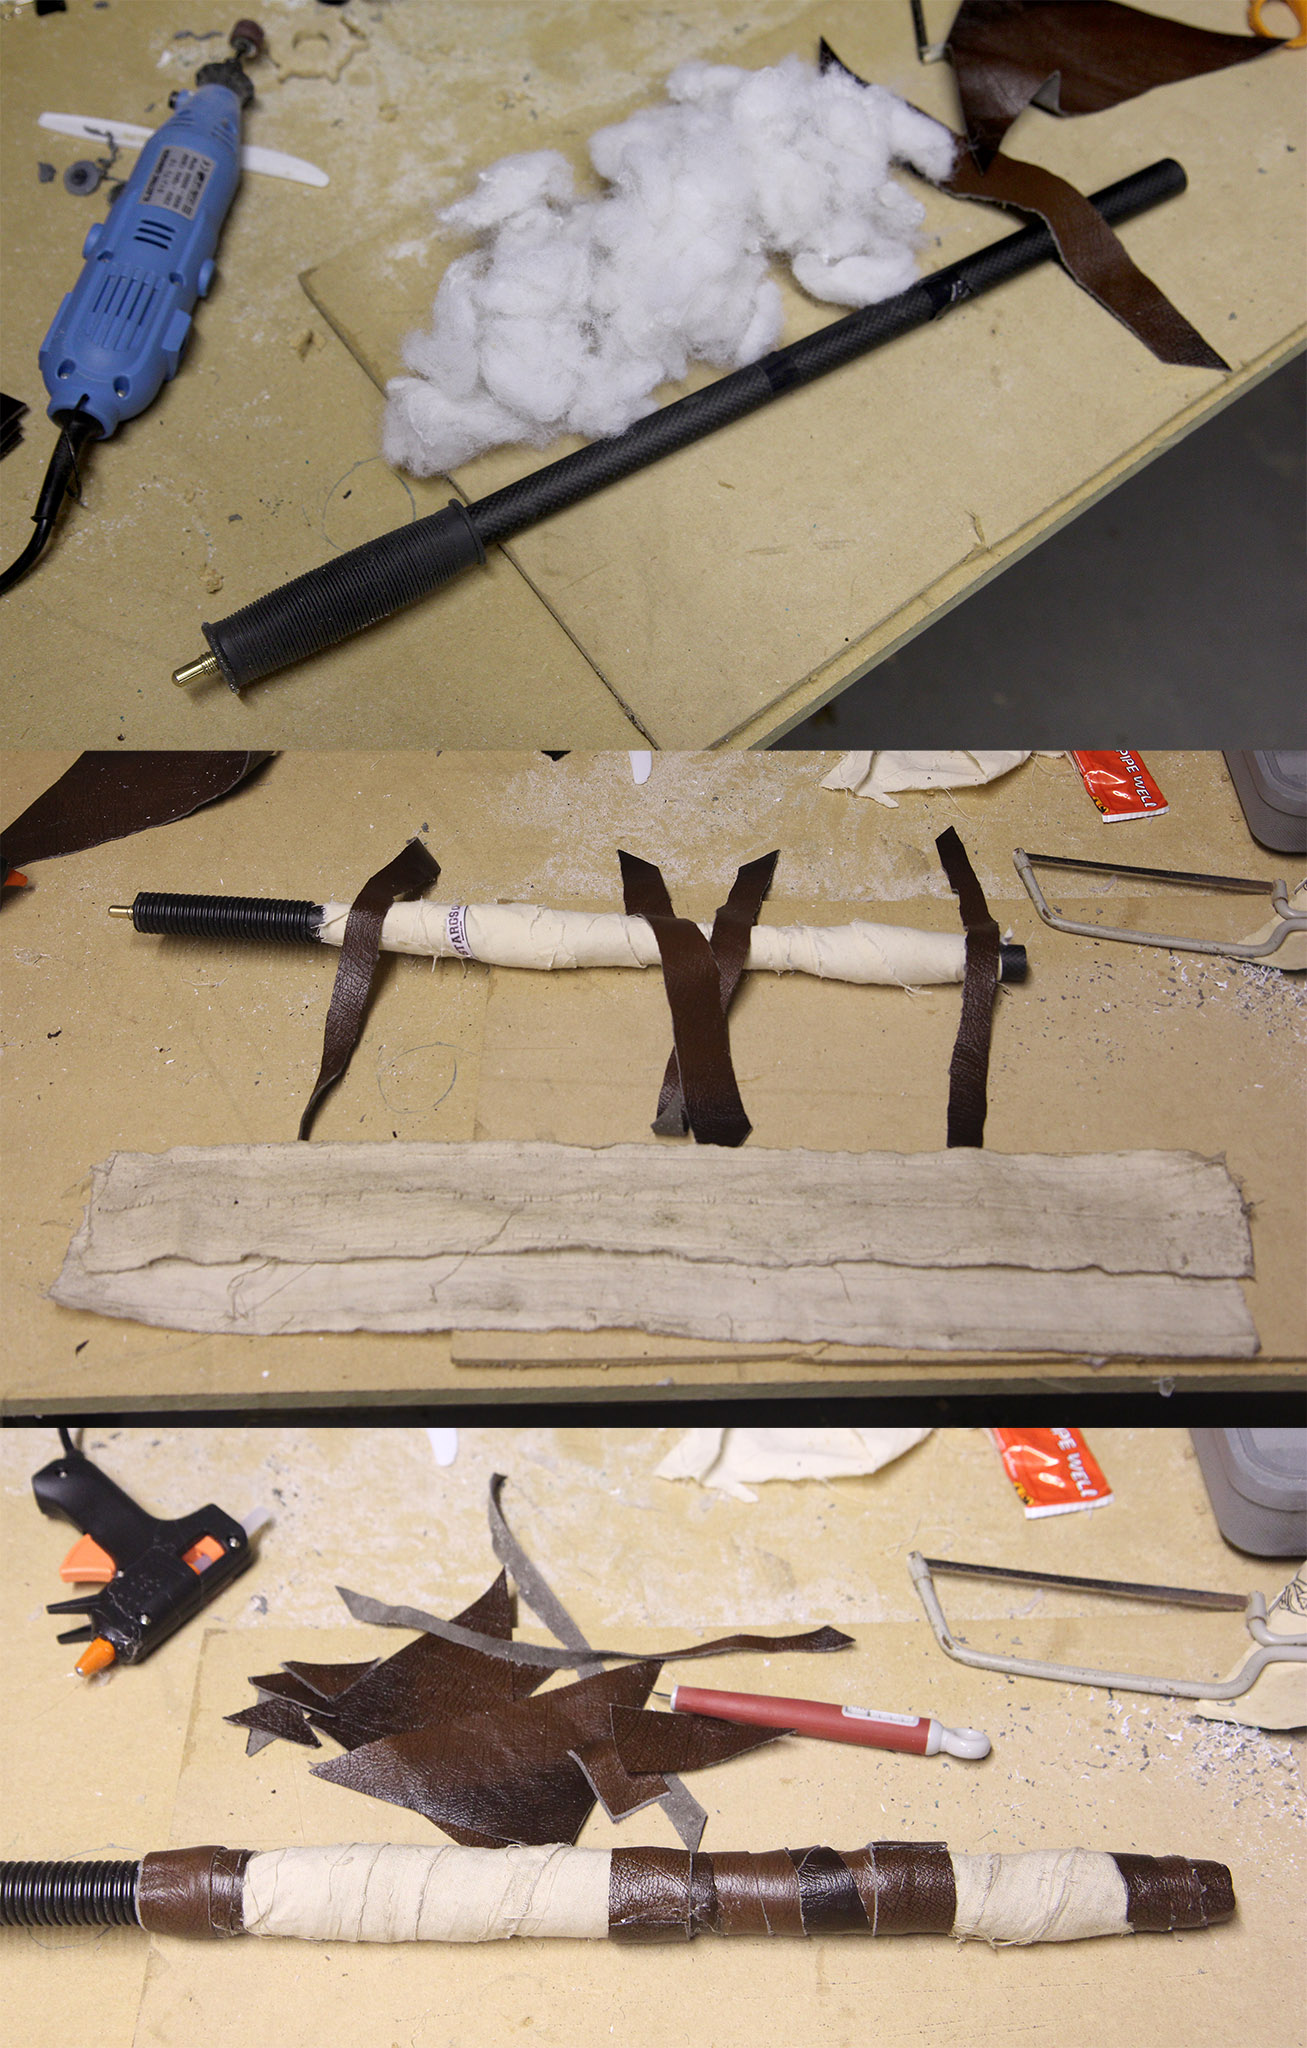 As you can see in the picture above this is a third of the staff with all the components dry fitted. The large white ridged section is an old waste pipe that was cut down to fit in the space, it isn't as close to the section on the screen prop as I'd like, but it was the best thing I could find. Also shown is the cog like item that is on the staff, again I had nothing that would match it so I created my own version, just cut a disc out of some scrap wood and cut some rough teeth into it. As you can see in the picture above this is a third of the staff with all the components dry fitted. The large white ridged section is an old waste pipe that was cut down to fit in the space, it isn't as close to the section on the screen prop as I'd like, but it was the best thing I could find. Also shown is the cog like item that is on the staff, again I had nothing that would match it so I created my own version, just cut a disc out of some scrap wood and cut some rough teeth into it.The next think to tackle was the middle section and the fabric and leather handle. I had some off cuts of leather, the fabric is an old cotton shopping bag and I used a little stuffing from a cat bed to pad out the fabric sections for more comfort. I hot glued the stuffing lightly in place, wrapped one layer of fabric over it and then a top layer that had been aged (rubbed in mud, washed in pond water and air dried), followed by the leather strips. 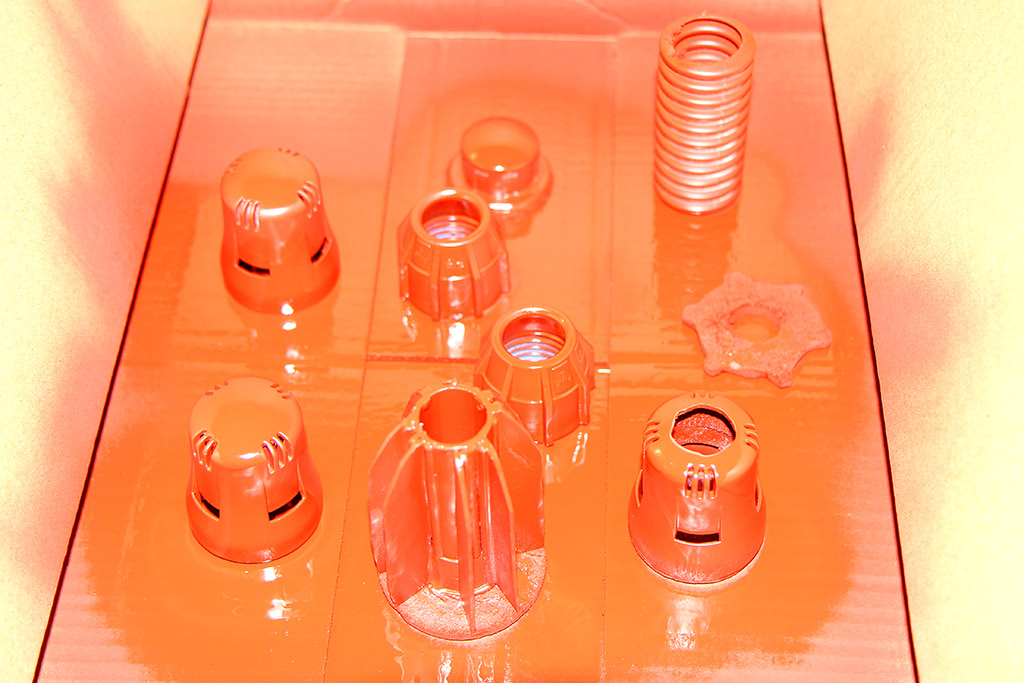 Then it was time to start painting, all the removable components got a couple of coats of red primer as you can see. Then it was time to start painting, all the removable components got a couple of coats of red primer as you can see.I did contemplate painting the whole thing, apart from the fabric and leather, but in the end decided to leave the staff and conduit pieces as they were to keep it looking as though they are all separate junk items, which they actually are !  While the paint was drying the next job was to create the fastenings for the carrying strap. As I already had some leather that seemed the logical choice to use, all it would take was creating the right sized strips, adding some press stud fastenings and trying it out. While the paint was drying the next job was to create the fastenings for the carrying strap. As I already had some leather that seemed the logical choice to use, all it would take was creating the right sized strips, adding some press stud fastenings and trying it out. The metal loops you can see were just something that was in an old drawer of bits it seemed to be about the right size and I think it looks good. A small alteration to the original plan was to glue another strip of leather between the two used on each end of the strap to keep the metal ring and straps together if I remove it when there is a Jakku / First Order battle to fight at Celebration :-) I have seen pictures with the strap removed so apart from being practical it is also more realistic. 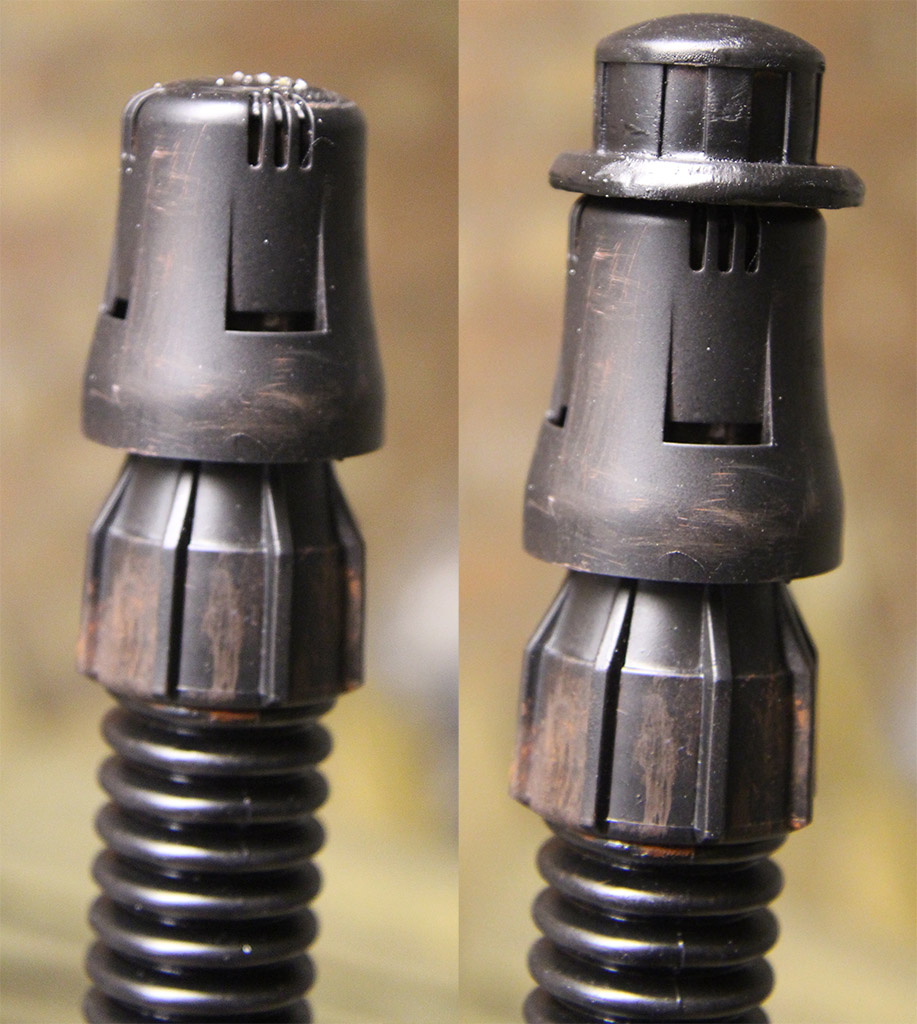 This next picture shows the painted items, with a little distressing, fitted to the end of the staff. If you look at the screen version there is an extra little section at the end, I created a version out of some scrap plastic discs and a radiator end cap. This next picture shows the painted items, with a little distressing, fitted to the end of the staff. If you look at the screen version there is an extra little section at the end, I created a version out of some scrap plastic discs and a radiator end cap.Not sure if I like it at the moment, so I may not fit it, or I may have another go at creating it. Here is a picture of the staff in its disassembled state, ready for transport. 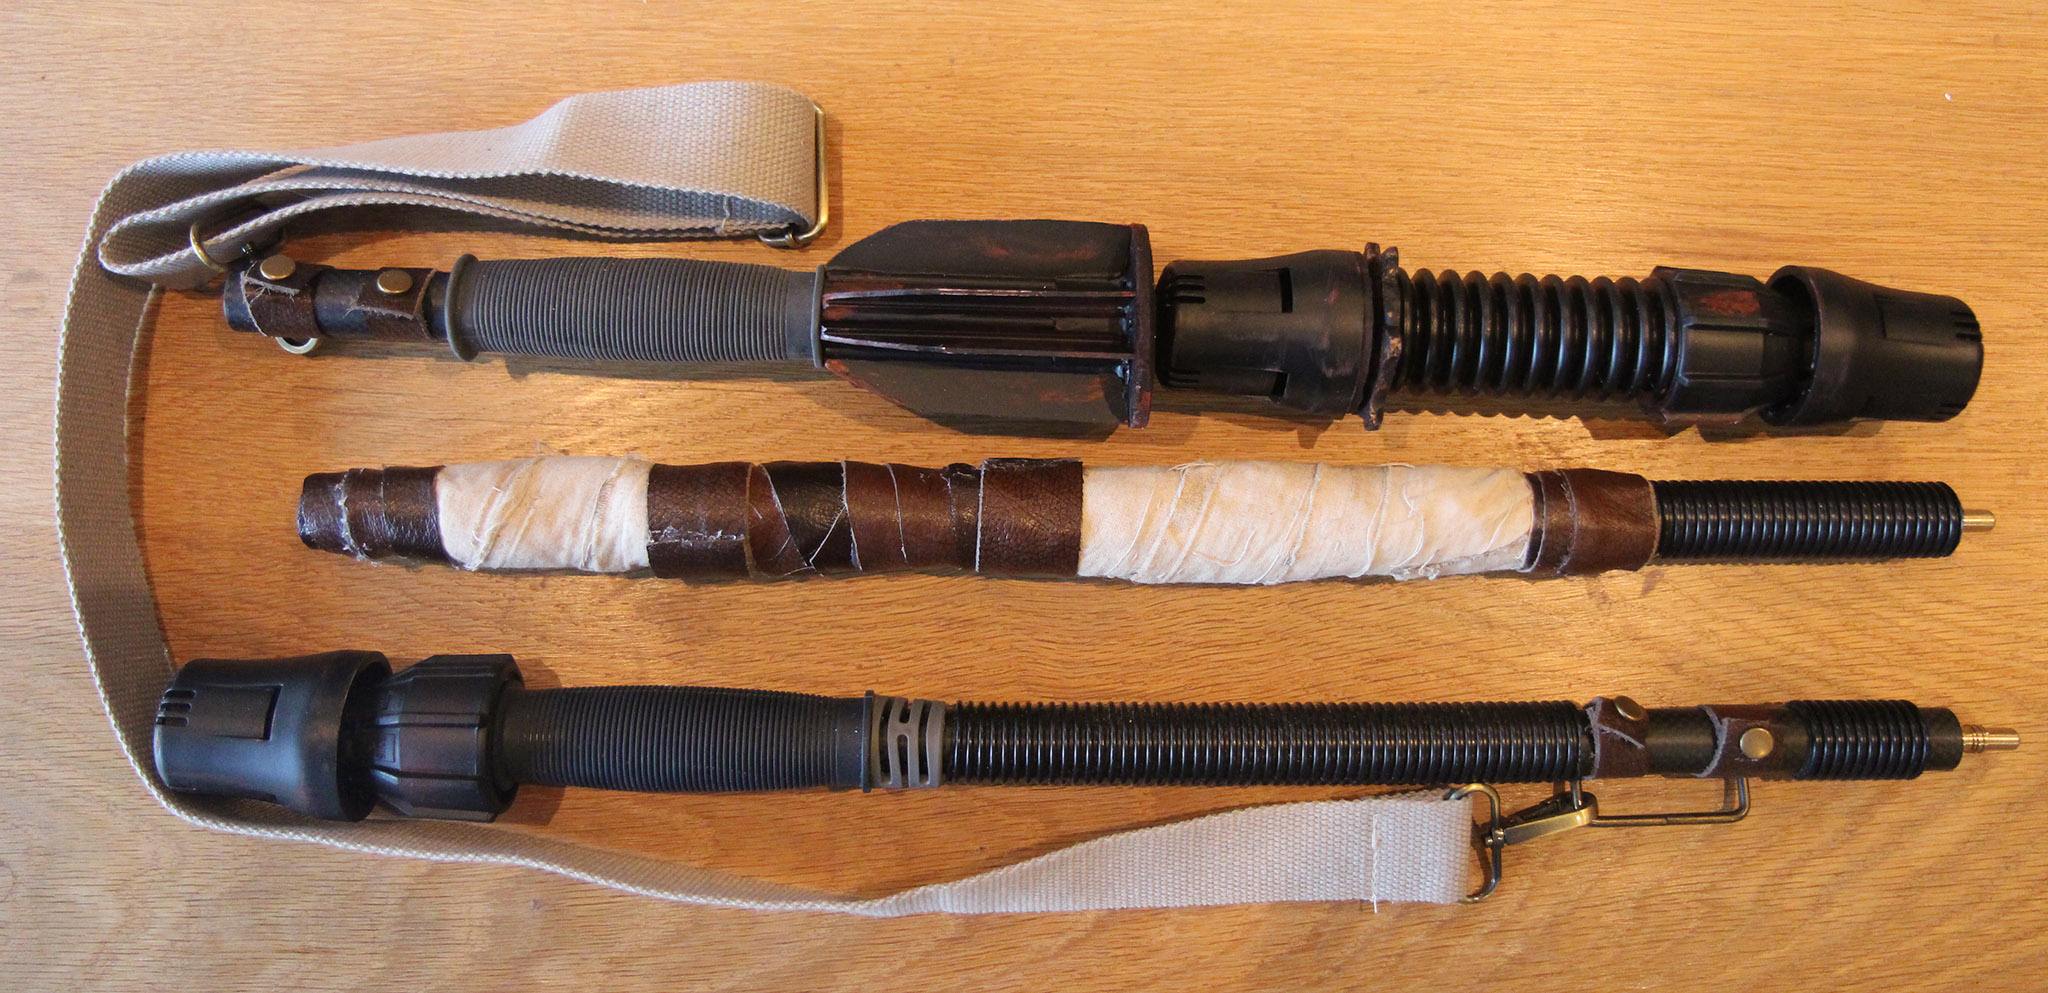 Finally a couple of pictures of me holding the staff in various action poses, ready for scavenging duties on Jakku ! Finally a couple of pictures of me holding the staff in various action poses, ready for scavenging duties on Jakku !I took the staff to a local comic con a couple of days ago to see what issues there might be in carrying around and it was surprisingly easy. When I arrived I started assembling it and a little boys voice made its way to my ears "Dad, dad that's Rey's Staff" that sort of made it all worthwhile and I knew what I had created wasn't simply a pile of assembled junk ! 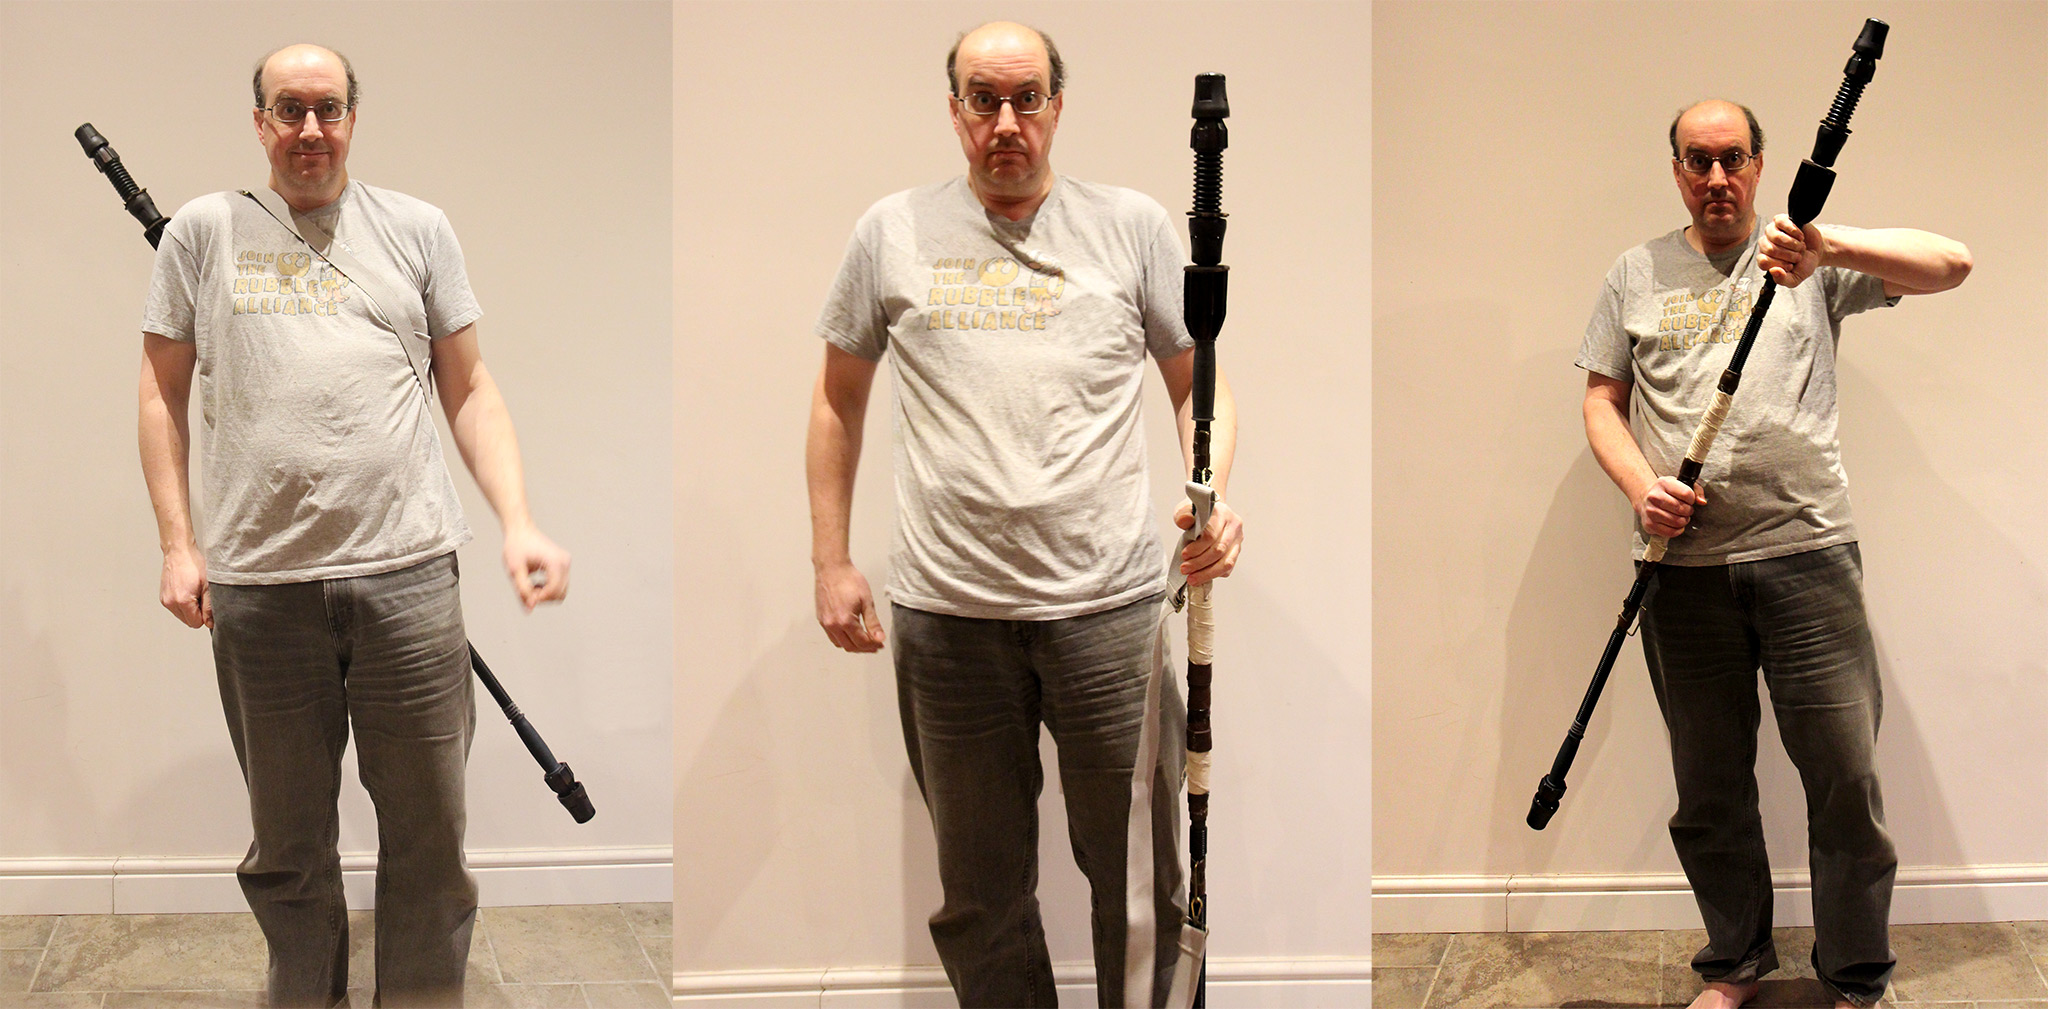 |
| << Return to the zort.co.uk home page |


 Why Zort ?